Milk Simmering: A Comprehensive Guide to Perfectly Simmered Milk
Simmering milk is a fundamental cooking technique used in a variety of recipes, from creamy sauces and soups to desserts like custards and puddings. While it may seem simple, simmering milk requires precision and attention to detail to avoid common pitfalls like scorching, boiling over, or curdling. In this blog, we’ll explore what simmering milk is, how to do it correctly, and what simmering milk looks like. Whether you’re a beginner or an experienced cook, this guide will help you master the art of simmering milk.
What is Simmering Milk?
Simmering milk involves heating it to a temperature just below its boiling point. Unlike boiling, which occurs at 212°F (100°C) at sea level, simmering happens at around 180°F to 190°F (82°C to 88°C). At this temperature, small bubbles form around the edges of the pot, and the surface of the milk shimmers gently. Simmering is a gentle cooking method that prevents the milk from scalding or curdling, making it ideal for delicate recipes.
Why Simmer Milk?
Simmering milk serves several purposes in cooking:
- Enhances Flavor: Simmering helps infuse flavors when adding ingredients like vanilla, spices, or herbs.
- Thickens Consistency: It reduces the liquid content, thickening the milk for sauces and custards.
- Prevents Curdling: Gentle heat prevents proteins in the milk from curdling, which can happen at higher temperatures.
- Kills Bacteria: Simmering pasteurizes milk, making it safer to consume in certain recipes.
The Science Behind Simmering Milk
Milk is a complex liquid composed of water, fats, proteins, and sugars. When heated, the proteins (casein and whey) begin to denature and coagulate. If the temperature rises too quickly or exceeds 200°F (93°C), the proteins can clump together, causing the milk to curdle. Simmering ensures that the milk heats evenly and gently, preserving its texture and consistency.
How to Simmer Milk: Step-by-Step Guide
Follow these steps to simmer milk perfectly every time:
Step 1: Choose the Right Pot
Use a heavy-bottomed saucepan or pot to distribute heat evenly and prevent scorching. Avoid thin pots, as they can cause hot spots.
Step 2: Pour the Milk
Pour the desired amount of milk into the pot. Leave some space at the top to prevent boiling over.
Step 3: Heat Gradually
Place the pot on medium-low heat. Heating the milk slowly prevents it from scorching or forming a skin on the surface.
Step 4: Stir Frequently
Use a wooden spoon or silicone spatula to stir the milk occasionally. This prevents a film from forming and ensures even heating.
Step 5: Watch for Bubbles
As the milk heats, small bubbles will form around the edges of the pot. This is the first sign that the milk is simmering.
Step 6: Adjust the Heat
Reduce the heat to low once the milk reaches a simmer. Maintain this gentle heat to keep the milk at the right temperature.
Step 7: Remove from Heat
Once the milk has simmered for the required time (as per your recipe), remove it from the heat to prevent overcooking.
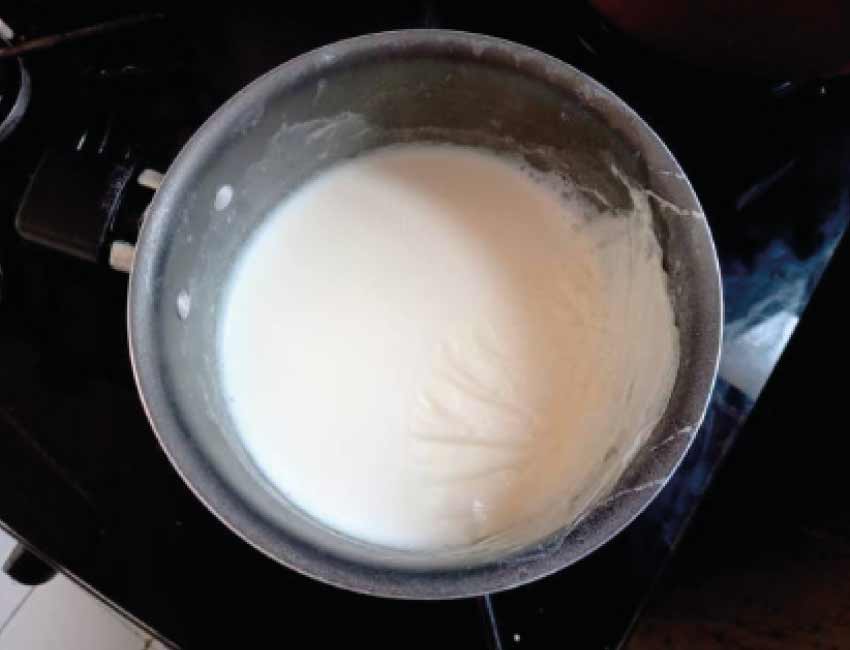
What Does Simmering Milk Look Like?
Simmering milk has distinct visual cues:
- Small Bubbles: Tiny bubbles form around the edges of the pot and occasionally rise to the surface.
- Steam: A steady stream of steam rises from the surface of the milk.
- Shimmering Surface: The surface of the milk shimmers gently, with slight movement but no vigorous boiling.
- No Rapid Boiling: Unlike boiling, simmering milk does not have large, rolling bubbles or a frothy surface.
Common Mistakes to Avoid When Simmering Milk
- Overheating: Heating milk too quickly can cause it to scorch or boil over.
- Not Stirring: Failing to stir can lead to a skin forming on the surface or uneven heating.
- Using High Heat: High heat can cause the milk to curdle or separate.
- Ignoring Visual Cues: Not paying attention to the bubbles and steam can result in overcooked milk.
Tips for Perfectly Simmered Milk
- Use Fresh Milk: Fresh milk is less likely to curdle than older milk.
- Add a Splash of Water: Adding a small amount of water to the pot before the milk can prevent scorching.
- Use a Thermometer: A kitchen thermometer can help you monitor the temperature accurately.
- Infuse Flavors: Add spices, vanilla, or herbs during the simmering process to enhance the flavor.
Recipes That Use Simmered Milk
Simmered milk is a key ingredient in many recipes, including:
- Béchamel Sauce: A classic white sauce made with simmered milk, butter, and flour.
- Rice Pudding: A creamy dessert made by simmering milk with rice and sugar.
- Hot Chocolate: Simmered milk creates a rich base for hot chocolate.
- Custards and Puddings: Simmered milk is used to create smooth, creamy textures in desserts.
What milk simmering is and its purpose in cooking?
Simmering milk is heating milk over low to medium heat until it reaches a gentle, steady simmer. This means that the milk is heated to a temperature just below its boiling point, typically around 180°F (82°C), and tiny bubbles form around the edges of the liquid. It’s important to avoid bringing the milk to a rolling boil, as this can cause it to scorch or develop skin on the surface.
The purpose of simmering milk in cooking is to achieve several goals:
Sterilization and Pasteurization: Simmering milk helps kill harmful bacteria and pathogens in raw milk. This makes the milk safe for consumption and extends its shelf life.
Texture and Flavor Development: Simmering milk can alter its texture and flavor. The process causes some of the water content in the milk to evaporate, resulting in a slightly thicker consistency. Simmering can enhance the milk’s natural sweetness and create a richer flavor profile, which is desirable in recipes like custards, puddings, and sauces.
Infusion and Flavor Incorporation: Simmering milk can also infuse it with flavors from other ingredients, such as vanilla beans, cinnamon sticks, or citrus zest. These added flavors can then be incorporated into various dishes to enhance their taste.
Dissolving and Mixing: When cooking with ingredients that need to be dissolved or mixed into a liquid, simmering milk can help achieve a smooth and uniform mixture. This is often seen in recipes like hot chocolate or certain soups.
Reducing Volume: Simmering milk can reduce its volume, concentrating its flavor and thickening it. This reduction process is typical when making condensed milk or certain creamy sauces.
Overall, simmering milk is a versatile technique that plays a crucial role in many recipes, allowing for the development of flavors, textures, and essential characteristics in many dishes.
The advantages of simmering milk, such as improved taste and texture in recipes
Simmering milk offers several advantages that contribute to improved taste and texture in various recipes.
Here are some of the key benefits:
Enhanced Flavor Development: Simmering milk gently over low to medium heat allows its natural sugars to caramelize slightly, resulting in a more prosperous and sweeter flavor profile. This enhanced flavor can be especially appealing in dishes like custards, puddings, and creamy sauces.
Creamier Texture: As milk simmers, some water content evaporates, leading to a concentration of milk solids and fats. This reduction in water content results in a creamier and thicker texture, which is highly desirable in recipes like béchamel sauce, cream-based soups, and rice puddings.
Improved Mouthfeel: The reduction in water content during simmering contributes to a smoother and silkier mouthfeel. This can add a luxurious and comforting quality to dishes, making them more enjoyable.
Balanced Flavors: Simmering milk with flavoring agents like vanilla beans, spices, or herbs allows the flavors of these ingredients to infuse into the milk. This results in a harmonious balance of flavors that can elevate the dish’s overall taste.
Reduced Risk of Scorching: Simmering milk over low heat reduces the risk of scorching instead of boiling it vigorously. Scorching occurs when milk solids stick to the bottom of the pot and burn, which can negatively affect the taste and texture of the final dish. Simmering allows for more controlled heat distribution and minimizes the likelihood of scorching.
Enhanced Binding and Emulsification: Simmering milk can aid in the binding and emulsification of ingredients. For instance, when making a creamy sauce or custard, the proteins in milk denature and solidify at a controlled pace during simmering, helping to create a smooth and cohesive texture.
Concentration of Flavor: Simmering milk can also reduce its volume, concentrating its flavor. This is particularly useful when making condensed milk or reductions for sauces, resulting in a more intense and flavorful end product.
Extended Shelf Life: Simmering milk helps to pasteurize it, eliminating harmful bacteria and pathogens. This extends the milk’s shelf life and makes it safer to consume, reducing the risk of foodborne illnesses.
In summary, simmering milk is a versatile cooking technique with numerous advantages, including improved taste and texture in various dishes. By gently heating milk and allowing it to undergo subtle chemical changes, chefs and cooks can create more decadent flavors, creamier textures, and a more enjoyable eating experience.
Step-by-step instructions on how to simmer milk properly, including temperature and duration
Simmering milk properly involves heating it gently to a temperature below its boiling point over a moderate heat source.
Here’s a step-by-step guide on how to steam milk:
Ingredients and Equipment:
Milk (any fat percentage, such as whole, 2%, or skim)
Saucepan or pot
Heat source (stove or induction cooktop)
Stirring utensil (wooden spoon or heat-resistant spatula)
Instructions:
Choose the Right Pot: Select a saucepan or pot that is large enough to hold the amount of milk you’re simmering without causing it to boil over. A larger surface area will allow for more even heat distribution.
Pour in the Milk: Pour the desired amount into the saucepan. Remember that milk expands as it’s heated, so leave some space at the top of the pot to prevent any overflow.
Set Heat to Medium-Low: Place the saucepan on the stove over medium-low heat. This heat setting ensures a gentle and gradual increase in temperature, reducing the risk of scorching or boiling over.
Stir Occasionally: As the milk heats up, stir it occasionally with a wooden spoon or heat-resistant spatula. Stirring prevents the milk from forming a skin on the surface and ensures even heating.
Monitor Temperature: Attach a kitchen thermometer to the pot’s side to monitor the milk’s temperature. The goal is to bring the milk to a temperature below its boiling point, around 180°F (82°C). This is the temperature range at which tiny bubbles will start forming around the edges of the milk.
Adjust Heat: If the milk is heating up too quickly or you see it starting to boil, lower the heat to maintain a gentle simmer. You want to avoid a rolling boil, as it can lead to scorching and affect the milk’s taste and texture.
Simmer Gently: Allow the milk to simmer gently at this temperature for about 5 to 10 minutes. The exact duration can vary based on the quantity of milk and your specific recipe. Steaming for this period helps to pasteurize the milk, develop flavors, and achieve the desired texture.
Remove from Heat: Once you’ve reached the desired temperature and simmering time, remove the saucepan from the heat source. If you infuse the milk with flavoring agents like vanilla or spices, you can let it steep for a few additional minutes off the heat.
Strain (if necessary): If you’ve added any flavoring agents you want to remove, strain the milk through a fine mesh sieve or cheesecloth to capture any solids.
Use as Needed: The simmered milk is now ready for your recipe. It’s ideal for dishes that benefit from its enhanced flavor and texture.
Following these steps and maintaining a watchful eye on the temperature and heat level, you can successfully simmer milk without risking scorching or boiling over, resulting in milk perfect for various culinary applications.
Helpful tips and techniques for achieving the ideal simmer include using a heavy-bottomed pan and stirring occasionally.
Achieving the ideal simmer requires careful attention and a few techniques to ensure the milk is heated gently and evenly.
Here are some additional tips to help you achieve the best results:
Use a Heavy-Bottomed Pan: Choose a saucepan or pot with a heavy-bottomed base. A heavy-bottomed pan distributes heat more evenly, reducing the risk of hot spots and preventing the milk from scorching.
Stir Occasionally: Stir the milk occasionally while it’s simmering. This helps prevent the milk from sticking to the bottom of the pan and promotes even heating. Use a wooden spoon or heat-resistant spatula for gentle stirring.
Preheat the Pan: Preheat the saucepan over low heat for a minute or two before adding the milk. This helps reduce the temperature shock when the cold milk is added, leading to even heating.
Avoid Boiling Over: As the milk heats up, it rises, especially as bubbles form. Keep an eye on the milk’s level in the pot to prevent boiling over. If it starts approaching the rim of the pan, lower the heat slightly or remove the pan from the heat briefly.
Temperature Control: Adjust the heat source to maintain a consistent simmer. If the milk starts to boil or form large bubbles, lower the heat immediately to bring it back to a gentle simmer.
Use a Diffuser: If you’re concerned about controlling the heat more precisely, use a heat diffuser or a flame tamer. These accessories help distribute the heat more evenly and prevent direct contact between the pan and the heat source.
Covering the Pan: Whether or not to cover the pan during simmering depends on the recipe. You might leave the pan uncovered to concentrate flavors or achieve a thicker consistency. Covering the pan can trap steam, potentially leading to excess moisture.
Temperature Monitoring: Keep a kitchen thermometer handy to monitor the milk’s temperature. This ensures that you’re within the desired range for simmering, around 180°F (82°C).
Steeping Time for Flavor Infusion: If you’re infusing the milk with flavoring agents like vanilla or spices, remember that the milk can continue to develop flavors even after it’s removed from the heat. Letting the mixture steep off the heat for a few extra minutes can intensify the infusion.
Practice Patience: Achieving the ideal simmer takes time and patience. Rushing the process by turning up the heat can lead to overcooking or boiling over, so it’s best to maintain a steady and gentle pace.
Clean the Pan: After simmering milk, clean the pan promptly to prevent any milk residue from sticking and hardening. This will make your cleanup process much more manageable.
Using these tips and techniques, you’ll be better equipped to achieve the perfect simmer for your milk-based recipes, resulting in improved flavor, texture, and overall culinary success.
Common mistakes to avoid
Simmering Milk requires careful attention to detail to avoid potential pitfalls impacting the final product’s taste, texture, and safety.
Here are some common mistakes to avoid when simmering Milk:
Boiling Over: Allowing the Milk to boil over can create a mess and lead to burnt Milk on the stovetop. To prevent this, use a pot with sufficient space, watch the heat level, lower the heat, or temporarily remove the bank if the Milk starts rising too much.
High Heat: Avoid using high heat to speed up the process. High heat can lead to uneven heating, scorching, and boiling over. Stick to medium-low heat for a gentle simmer.
Not Stirring: Refrain from stirring the Milk occasionally to avoid it sticking to the bottom of the Pan and scorching. Regular stirring helps distribute heat and prevent this issue.
Using the Wrong Pan: Thin-bottomed pans can lead to uneven heating and scorching. Opt for a heavy-bottomed pan to ensure even heat distribution.
Adding Cold Milk to a Hot Pan: Adding cold Milk to a hot pan can cause uneven temperature changes and potentially lead to scorching. Preheat the Pan gently before adding the Milk.
Leaving Milk Unattended: Simmering Milk requires attention. Leaving it unattended increases the risk of it boiling over, scorching, or reaching a full boil.
Not Monitoring Temperature: Without temperature monitoring, it’s easy to accidentally bring the Milk to a full boil, which can negatively affect taste and texture. Use a kitchen thermometer to maintain the desired simmering temperature.
Infusing Too Long: Avoid over-steeping if you’re infusing the Milk with flavors. Extended infusion times can result in an overpowering or bitter taste.
Using Dirty Utensils: Using utensils with residue from previous cooking can introduce unwanted flavors or particles into the Milk. Ensure your utensils are clean before using them.
Covering the Pan Completely: While covering it can help retain moisture, completely sealing it can create pressure and increase the likelihood of boiling over. Leave a small gap to allow steam to escape.
Not Adjusting Heat: Please adjust the heat as needed to avoid the Milk boiling or simmering too vigorously. Continuously monitor and adjust the heat to maintain a gentle simmer.
Overcooking: Simmered Milk can become too thick or develop an undesirable texture if cooked too long. Follow the recommended simmering time in your recipe.
Using Milk Straight from the Fridge: Cold Milk can cause the temperature to fluctuate and might require a longer simmering time. Let the Milk come to room temperature or warm it slightly before steaming.
Adding Acidic Ingredients Too Early: If your recipe includes acidic ingredients like lemon juice, avoid adding them to the Milk too early, as they can cause curdling. Add them after simmering and turn off the heat.
Not Cooling Before Refrigerating: If you’re not using the simmered Milk immediately, allow it to cool. Placing hot Milk directly in the fridge can affect its overall quality.
By avoiding these common mistakes and following the proper techniques for simmering Milk, you can achieve the desired results for your culinary creations.